Frozen chocolate covered bananas require a lot of patience. I realize that may sound silly, but when the Hungry Boys and I want frozen chocolate covered bananas, we want them NOW! And I’ve finally figured out how to indulge our desire for instant chocolaty banana gratification.
It started with magic shell. (As is so often does.) Remember that stuff? Surprisingly, it’s not filled with nearly as many chemicals as I expected. Instead of that being a reason to buy some, it became reason to make some. If it’s simple to make in a plant, it’s even simpler (and always healthier) to make at home. With two all-natural ingredients and 5 minutes, you’re in business.
So there I am, with my homemade magic shell, wondering what besides ice cream is cold enough to turn the liquid sauce into a chocolate candy coating. That’s when it came to me: frozen bananas.
I love frozen chocolate covered bananas, but they are a bit of a hassle. First you cut them up and let them freeze. Then you dip in chocolate and—that’s right—the freezer again. By the time they’re all ready and set, the craving has passed, or worse, intensified. (Trust me that more than one frozen chocolate covered banana is not a good thing.)
What if the bananas were already frozen—fruit-in-waiting, if you will? And what if the chocolate magically hardened in an instant? This, my friends, is all possible. Within reach, even!
Frozen banana pieces + homemade magic shell = the easiest (and fastest!) frozen chocolate covered banana treat ever.
At least one day in advance of digging in, cut up some bananas and place the pieces onto a parchment lined cookie sheet to freeze. Since my kids are still young, banana “bites” are the prefect size. Plus, they can easily be put onto lollipop sticks, which makes them doubly exciting. Once frozen through, if you don’t plan on using the banana pieces right away, carefully package them up for continued freezer storage.
Also at least one day ahead of time, make the homemade magic shell. It seriously takes 5 minutes. To store the sauce, pour into a glass jar or plastic squeeze bottle and keep at room temperature. If the sauce turns solid, microwave or, if stored in plastic, place in a warm water bath until the sauce liquefies. (Never microwave in plastic!) Both the bananas and the magic shell will keep for quite a while.
Whenever you’re ready to eat, pull out some frozen banana pieces, dip in magic shell and watch it harden. You’ll be enjoying frozen chocolate covered bananas within seconds!
If you want to get fun and fancy free, make Chocolate Banana Pops!
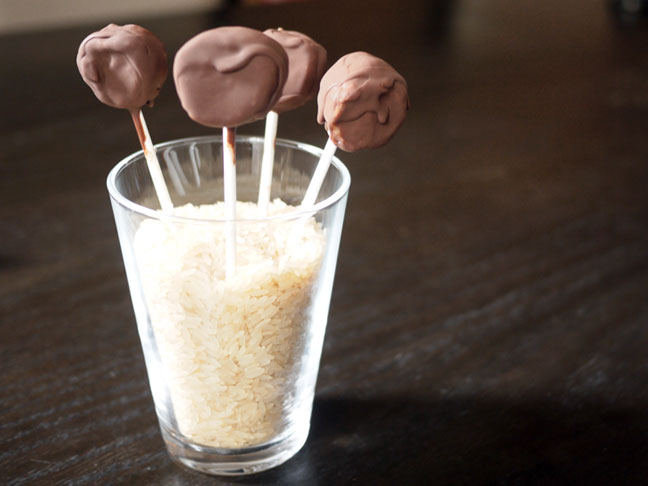
Begin by setting up a pop-making station. Once you get started, you’ll need to move fast and having everything ready will help. It’s especially important to have a glass filled with rice into which you can prop the finished lollipops; this will keep the chocolate smooth and attached to the banana while it hardens.
Once everything is in place, use a sharp toothpick to make a hole where you want to insert a lollipop stick. Be careful or your banana piece will crack. Oops!
Let’s try again!
Much better! Then carefully insert the thicker lollipop stick. Be careful—the piece can still split (and these are not chocolate banana split pops!).
Dip the banana into a small bowl filled with liquid magic shell to cover completely. Sometimes I keep a little magic shell in a squeeze bottle to neatly cover the part around the stick. It keeps the chocolate from dripping down the stick. Clearly, other times I don’t bother.
Stick the finished pop in the rice-filled cup to harden completely, and repeat. The banana pops will stay frozen for a little while but, if you’re not going to serve them immediately, put pops that have dried for at least 5 minutes onto a parchment lined baking sheet and back into the freezer until ready to serve. Keeping them out not only puts them at risk of getting mushy-soft, but also of being eaten prematurely… by mama…
